Your Cart is Empty
Mix it Up with Beads, Wire & the Jewel Loom - Inspirations with Jewels
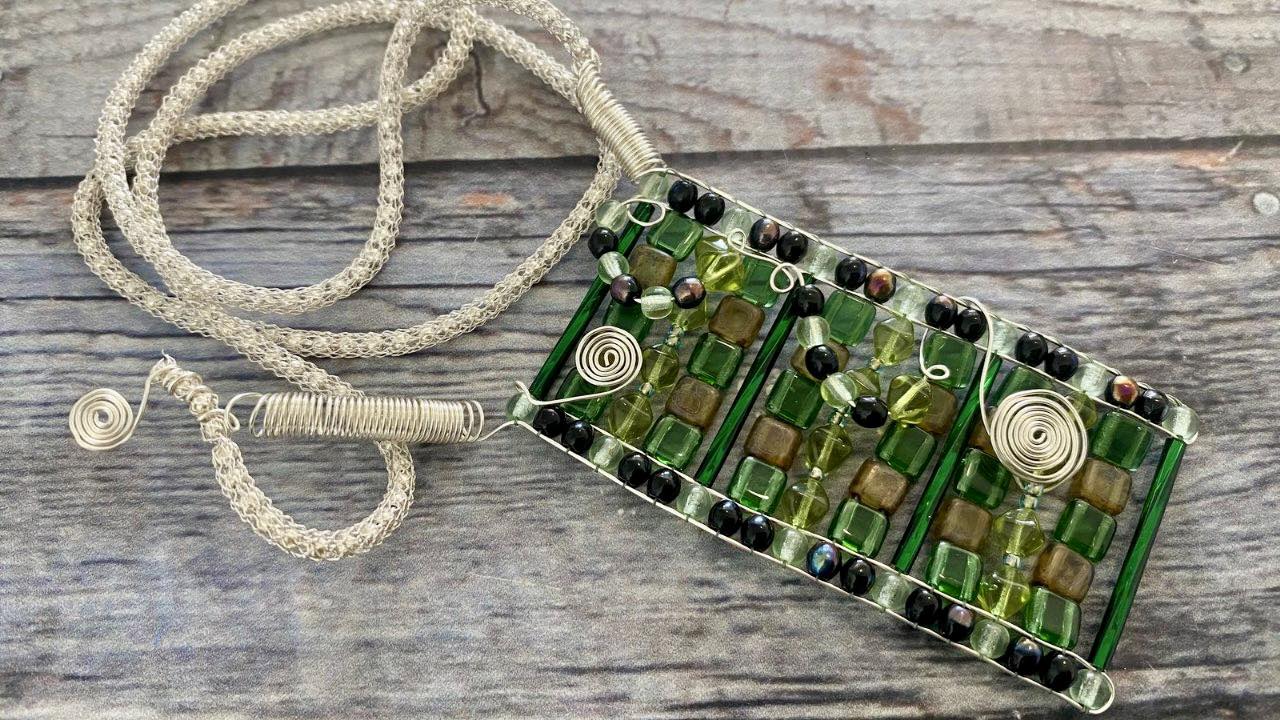

Learn to create a pendant on the Jewel Loom or Baby Jewel Loom, using wire & mixed sizes of beads. Using the extra wire on the warps, Jewels also shows how to create decorative swirls & coils, using the Coiling Gizmo. She also shows how to attach a unique way to attach the pendant to SilverSilk capture chain. You may even consider tucking the ends of the capture chain into coils, for another look, before wrapping the wire ends aroun the capture chain.
If you would like to replicate this pattern, follow the pattern below & look closely at the photo on this page:
- Row 1: 1 - 4mm Green Fire Polish, 1 - Long Bugle Bead, 1 - 4mm Green Fire Polish
- Row 2: 1 - 4mm Dark Fire Polish, 1 - Green Tile, 1 - Citrine Tile, 1 - Green Tile, 1 - Citrine Tile, 1 - Green Tile, 1 - 4mm Dark Fire Polish
- Row 3: 1 - 4mm Dark Fire Polish, go through the bottom holes of the 5 tile beads listed in second row, 1 - 4mm Dark Fire Polish
- Row 4: 1 - 4mm Green Fire Polish, 1 green bicone, 1 - 11/0 seed bead, 1 green bicone, 2 -11/0 seed bead, 1 green bicone, 1 11/0 seed bead, 1 green bicone, 1 - 4mm Green Fire Polish
- Row 5: 1 - 4mm Dark Fire Polish, 1 - Green Tile, 1 - Citrine Tile, 1 - Green Tile, 1 - Citrine Tile, 1 - Green Tile, 1 - 4mm Dark Fire Polish
- Row 6: 1 - 4mm Dark Fire Polish, go through the bottom holes of the 5 tile beads listed in second row, 1 - 4mm Darkl Fire Polish
- Repeat rows 1 to 6 twice.
- Finish by repeating Row 1.
Jewels created this project to show techniques & to answer some of the questions beginner Jewel Loomers have.
Watch the tutorial below:
Links for products used in this project:
- Jewel Loom YosiBear Pendant Bead kit (only $12, plus shipping in U.S.A.): https://jewelloom.com/collections/jewel-loom-school-live-product-showcase/products/jewel-loom-big-bear-pendant-bead-kit?aff=11
- Jewel Loom, Baby Loom, & accessories: https://jewelloom.com/collections/jewel-loom-original-baby?aff=11
- Coiling Gizmo Deluxe Winder: https://jewelloom.com/products/coiling-gizmo-deluxe-winder?aff=11
- Wildfire: https://jewelloom.com/collections/jewelry-making-buttons/wildfire?aff-11
- Jewel Loom Needles: https://jewelloom.com/collections/jewelry-making-buttons/beading-needles?aff=11
- SilverSilk Capture Chain: https://www.silversilkonline.com/capture-chain
- Artistic Wire: www.beadalon.com
Subscribe to the Jewel Loom YouTube channel to access past & current tutorials: https://www.youtube.com/c/JewelLoom
Sign up for the Jewel Loom newsletter & get 15% off your first order, plus 3 new patterns for first time email subscribers: https://jewelloom.com/pages/save-15-and-get-free-friendship-bracelet-instructions
Join the Birthday club at www.jewelloom.com and receive Free Shipping on your order placed on Birthday.
Check out the Jewel Loom Blog for past & current tutorials, plus read details on project: https://jewelloom.com/blogs/craft-hangover
Follow Jewel Loom on Instagram:
Like & follow the Jewel Loom Facebook page: https://www.facebook.com/Jewelloom
We have a free group on Facebook full of inspiration, tips and techniques. It's a great community! You can join the Jewelry Making with Jewel Loom community page at the following link: https://www.facebook.com/groups/jewelloom/
Please contact Jewels with any questions you have about her looms: email -hello@jewelloom.com
Transcript:
welcome welcome welcome I see everyone lining outside in
the hallway waiting for the jewel loom School Maria I hate to tell you but
Claire beat you Claire beat you to the front door
today you better figure out how to take your take your spot back in
line oh my goodness what a beautiful beautiful day welcome to JW Loom School
live I'm Juliana the inventor of the Jew Loom the blue one right here and I'm
gonna actually be working with the jewel loom today so I love love love warping
with artistic wire and especially on the plastic loom um because of the grids and
everything I do it on the wood as well but I'll kind of go with a smaller um
gauge WI maybe like 26 versus the 24 although I have done 24
as well you just have to be more careful when you're on on the wood Looms on those grids oh my goodness Cynthia and
um it's funny how Joan can be everywhere I see her I see her real name
Jennifer is here hey I want to give a huge shout out to all of the
bellacon attendees that might be peeking in here I want to make sure that we show
them a lot of love these are people that are attending the virtual bellacon event
they are Eileen Hall's Community um and so we want to give them
a big delicious hug I know a couple of them have actually joined the free Facebook group and so make sure that um
you know if you're in there and they're asking questions that you um lend a
helping hand lots of yummy people hi Zach hi
Jennifer very very cool oh I love it Melanie um and Betty and Jane everyone's
hello hello hello hey I do have a special
[Laughter] guest I
Eileen Hull and I are going to be together so listen we have been industry besties like forever I was thinking
about it earlier like we literally I think pretty sure we have known each other for at least 20 years so we used
to work um at sizzix together and eileene designed a well she has just
designed a plethora of products but um die cuts and so she's really well known
for her die cuts that are cut out of really great um like mat type board and
so they make journals and um one of her projects for Bellon is like a little sewing chest and she's made campers and
all kinds of cool stuff and of course um she's super heavy into the paper crafting world but a lot of folks over
there are stitching and doing different things as well and so I'm really
excited I'm sure elen's just gonna be really happy when she sees that I put
her on a I was like well she's got to be here to
say hi to her friends okay so here's the new Eileen
Hall Loom all right and so if you ordered your Workshop kit for the Bellon
event this is the new loom and it's so so cool eileene loves it she really does
and it comes with an awesome comb so when we're working with fibers or anything like that and her little needle
I said what do you want on your needle like what's your jam what's your saying
um and she says well how about it's not perfect but that doesn't bother me I was
like I love that so here's her little baby needle that comes with her comes with her Loom and so yeah so people um
the loom is up on the website already ready even if you are not a bellicon
attendee you can purchase a loom if you want uh just really um need to make sure
that you understand you're not that's not getting you into the bellicon event okay there's not a workshop that comes
with the loom if you're not in you know registered for the bellicon event okay I
could just like keep I should have like figured out how to somehow make a stand so that eileene
just could be here the whole entire whole entire time anyway girlfriend great to see
you we're going to be together in Texas um just in a couple of weeks even though
the Bellon event is virtual and you still can sign up um there are a handful
of us uh instructors teachers business owners that are flying into Texas and uh
we will be at Julie mcguffy's home and it is going to be a blast so I'm super
excited about that hey Carol everyone as well cool okay so let's get
to it I'm gonna I'm gon to put gosh now I feel bad where am I gonna put
her where can I put her you know what I think I could do this I could put her in
front of the wisdom Warrior for now okay let's not do
that let's not do that okay there we go I'm going to lay her down gently so that uh
all goes well all right put baby in the corner hey Robin I'm loving your your
work holy cowgirl come on now all right that is a come on now that uh piece that
you did I believe with the with the silver silk so I asked the question the other day in the uh free Facebook jul
Loom group you know hey what do you need to know you know as I'm building my
segments here for my YouTube lives and and recorded videos Etc what is it that
you need to know and so a lot of people chimed in and a couple people said the same thing so I thought well I'm going
to start with that and what that is is how do you
take different style of beads differ sized beads and put them into one loomed
project and it's literally like one of my most favorite things to do it's a great way to utilize all those extra
beads that you might have from projects and so um mixing it up is a super cool
way to bead on the jewel loom I do want to give Claire a shout out really quick
Claire was first uh in line in the hallway uh usually nobody beats Maria
but Claire was hanging out there and Claire I did see your comment in regards to your first warp strand being loose
I'm going to demo that next Thursday day we'll just like go back to the basics with the jewel loom and um but what I
want to tell you is that usually what happens is that you're losing you know
you're just losing your grip right like and it's normal it is like 100% normal
that the very first warp is loose that that's usually what
happens to folks when they're still learning okay and um and so we we will
definitely address that I also want to mention to you as Joan pointed out that
when you're done warping you know you're supposed to take your Rod out and what
happens is that the the loom extends even more and the warps become even more tight so we'll speak to all of that in a
demonstration that will be dedicated to that next Thursday but I wanted to
acknowledge you Claire I want to keep cheering you on um just keep practicing
and know that it's very normal that in the beginning that first warp is the one that's going to give you the most
trouble so just keep practicing and um and in the meantime Joan I do believe
had just found she found a link for you to go watch and um so that that
hopefully will will help you out but listen I designed um a quick little
pendant for you this is the Yogi Yogi I keep wanting to say Yogi
Yosi bear Yosi bear and why is it the Yosi bear well I couldn't figure
out if I was feeling the Big Bear Vibe or euse and when I looked at it all
together I was like it's a little of each right because right now eusee is like so incredibly gorgeous
snow the waterfalls are jamming like it's just beautiful Caroline to your
point full on stained glass apparently a couple of people were telling Joan it looked like a circuit board um I get it
I get it but I'm more on board with the whole like stained glass look so we got a little big bear we got
a little stained glass we got a little Ed going on and we got a lot of creativity I did put a kit together for
you and it's h five strands of gorgeous check glass beads four bugles which are
really hard to come by especially the uh 1.25 inch long ones I put all of that
in a kit for you it's like $12 it's like easy peasy Priced Right
throw your shipping on there and call it a day okay you will need your wire I I
know a lot of us have a ton of wire so I didn't want to like go through the labor expense of that but anyway so so
beautiful um what I'm going to do is I'm going to let's see
here so how do you get to that point right like how do you even
know what equals what what you know how do you how do you figure it out and I'm
just here to tell you like there's not like some big amazing answer okay it's just pretty
much trial and error and what I typically do is I take pieces of wire or I take my Jew Loom needles because
they're three inches long and I will just start to build out row by row
like what equals what equals a 4 mm bead round a
one and a qu inch long bugle and another 4 millimeter round what equals that
well I've got another 4 mm bead I've got 1 2 3 4 five two whole Square beads and
another four okay so then you start to break it down even more and you're like
well what equals 1 6 mm Square bead well for 3 mm
beads right or one 6 millim round bead
but here's the funny you would think you would think okay these are 12
mm pyramids okay I one time tried to do
12 mm pyramids with two 6 mm pyramids
and guess what did not equal 12 no
because see the little roundness on that 12 this is the 12 millimeter okay so the
two 6 mm pyramids were a little bit more Square so two 6 mm pyramids do not equal
112 mm so you kind of like have to just play around with it right you kind of have to just do some math sketch it out
just get your beads get little pieces of wire or use your needles to play around
with start lining things up to try to figure out like what equals what I just
gave you some examples I will tell you that two 6 MIM rounds do equal
112 we do know that okay we do know that uh I can also
tell you that uh three four millimeter wait are those
fours yes three four millimeter rounds
equal 112 okay look how pretty that is I mean that's so gorgeous very simple but yeah
I love the cut in you know how you go from the twelves to the you know to the
fours um you know here's another example where we've
got the what I was telling you earlier right here's four 3mm round beads these little
guys they equal two bugles they equal one 6 mm square and they equal one 6 mm
round so you're just kind of playing around with the idea
of what matches what what looks good together you know um and I'm going to
show you something cool because in this one what I actually did is I ended up doing I ended up doing see
these dark ones these are 4 millimeter and at first I thought oh
poopies like two fours are not going to equal a six darn it and then I thought well I'm
going to see what it looks like and I actually love it I don't think it's a problem so these are the two fours these
are my two whole 6 mm squares and all is well in the world like it's not bad at all I think it's
super cool okay so I hope hope that kind of
gives you some uh empowerment almost in a way
right like it's not like some big Magical Mystery it's just have fun with
it and definitely when you're doing this kind of mix it up and we're going to get into the demo you want to have a 11os
around and you might even consider having some 80 so like say the too 110 seed beads
too 80 seed beads this is where all that bead soup comes into play where you can just like reach into your stash that
you've not used because for instance when I did these beautiful little um oh
gosh the Rondell guys here right there's one two there's four of them that
equal the five six mm squares but there was a gap and it was a gap that would be
accommodated by an 110 seedbead so you really just need to
like have fun with it don't take it too serious but I am going to tell you the important things to know okay so here we
go I'm going to scooch everything
over and I did decide to work on my original jewel loom
definitely could have done this on my baby jewel loom especially if I wanted
to save the wire but when I took the piece off of the original jewel loom and saw how much wire especially the good
stuff right like I'm working with the non-tarnish silver artistic wire 24
gauge it it's on the higher end and I'm certainly not going to toss it and so I
was like oh my gosh what am I going to do and that that's where I was like oh my gosh I'm totally going to set up my
coiling Gizmo and I'm going to coil those long pieces of wire I'm not going
to let them go to waste and then on the shorter ones I'm going to make
swirls so no waste here with the wire all right so we've got the original
jewel loom and I do have the uh metal rod already inserted I'm going to pop it
out really quick though hold on okay so there's the J Loom here's the
rod and let me see if we can do this I think I feel like I want to stand up to
do it I I just feel weird about the process of putting the rod in when I'm sitting down okay so here's the rod okay
and we're going to take the one end of the rod put it into the hole that's at
the bottom that's closest to your body so you can see that this is my body it's not a stunt
double all right so we're gonna put that into that bottom hole there bring the
rod forward and because I am standing up oh my goodness I'm so short I'm gonna
use my belly and I'm going to pop the rod into the top hole okay so this is
your jewel loom with the rod in it and now it is ready to have your warping material now
typically all right typically I'm going to sit down make sure my chairs there so I don't fall on my tush typically we're
warping with like a beading thread or maybe even like a hemp cord but I really wanted to warp with
wire and I love warping with wire especially when I'm working with the jewel loom it's just so
beautiful and just going to grab my flats to get this out of the little hook
again this is Artistic wire non-tarnish silver and it is 24 gauge
okay so this is a spool I'm you know this could be an old school spool from
back in the day I don't know that it's a beetle on spool but it's artistic
wire we're just going to move that over and I guess Joan do you just want to make me small and then um make the
overhead bigger awesome that's like the dirtiest
Rod I bet I bet this is a rod from like 2012 when the Lo first came out
all right so I've turned my loom over okay and this area right here is closest
to my body and this is my right hand and I'm working from the spool and one of
the great things about working with the wire is that you don't have to worry about like
tying it's so cool so what I'll just do is like leave a tail what is that like two two and a quart two and a quarter
inches long and then I'm just going to wrap it around the back of that
button and then I'll just take like these two pieces and kind of twist them
together okay and then we'll just get that out of the way and next what I'm going to do is I
am going to bring the warp and just lay it on one of
the grooves okay and then I'm going to flip
it over so we're treating it just like we do whoops let's get in this shot here we're
treating it just like we do when we are using the beading thread now when you
are working with the wire it's definitely going to dance a little the warmth from your
hand whoa is definitely going to U Massage the wire and get the Kinks out
I'm just going to put this next to me but I do have a pair of nylon jaw players handy okay so I'm just going to
kind of like rub it so that the Kinks get out and then I'm going to come down here and
I'm going to just eyeball you don't have to really worry about counting too much here I can see that's pretty
straight then I'm going to flip it over wrap it around the back button and come
back up now the first warp area that I want to create is so that
the three or 4 mm bead will fit in between these two warps
and so I'm going to skip one two grooves okay then I'm going to flip it
over again wrap it around the back button and now this time this time this
area right here has to accommodate the bugle so let me flip
over I'm going to do a little guest but I'm going to bring in my bugle
bead so hold tight and then I'm going to lay it
on I'm going to lay it on the grid there let's see how close I got let me get my
let me get my fingers out of the
way okay okay so that looks about right so we've
got we've got one two 3 4 five 6 7 8 9 10
11 12 13 14 15 16 17 18 19
20 so we have skipped 20 rows to
accommodate the biggest I don't think it's the biggest I don't think that
would be the right word let me see I want to say like the um what's the
difference between biggest and longest because this is
our in essence biggest bead longest bead and we do need the warps to be able to
be big enough right that spread there to accommodate it
so again I've skipped 20 grooves and so I'm going to
continue all the way down and I'm just going to give it a guesstimate there I think that looks
like 20 and a c oops turn it go back around and then again I'm going to skip
two grooves flip it over come back
up okay and then this time I'll turn it over and I'm going to come around the
back here wrap it around a few times again the cool thing about the wire is that you know you're you're not so
stressed out about losing the tension because it's holding um holding it now I
don't want to waste so I'm going to cut just about right
there and now what I can do is kind of just take these ends twist them
together so the million dooll question that's going to come up next is whether
or not I remove the rod the wire is pretty taut it's very
nice and strong it's not like say a Sor Ribbon or a piece of denim or something
like a cotton so I do feel comfortable in removing the rod 9.9 times out of 10
we're removing the rod because once we do that all right see how the loom
flexed and look at how nice those wired warps turned out Joan can you put me up
a little bit I want to put them to this other camera as well so I just want to show you that look at
how look at how delicious that came out so this is 24 gauge wire warped and when
I took the rod out which is very important I know there are some people out there who are teaching to leave the
rod in you don't leave the rod in especially when you're with beating thread or wire hemp cord
Etc if I'm working with a really stretchy leather I might leave the rod
in just because it's going to stretch and then it's going to go right so but
look at that now this is a perfect example of where the bed of the jewel
loom and the top of the warp listen did you hear
that Jan's funny she's like I can't get it to do
that I'm impressed with myself that I got the wire to make that strum you go
Jewels all right the bottom of the jewel loom to the top right here should never be more than two inches if your
measurement of the bottom of the jewel loom to the top of your warps is more than that you have warp too tight and
you are stressing your flexible plastic out remember it's flexible not bendable
okay so again the bottom the bed right here the you know and that could be well
with where the jeel loom logo is okay the belly of the jewel loom to the top
of your warp should never be more than 2 Ines so it's really important okay let's
go back so I already have my jewel loom needle and my Wildfire on here and I've
got about two yards I call them Jewel yards right so like I just stretch my arms and I
cut and what I'm going to do um I feel like need to kind of raise this up a
little bit there we go if you want to put my
overhead back on Joan
okay so let's just get that bad boy tight okay all right uh
oh what just happened you want to bring me back up
really quick I don't know what just happened hold
[Laughter] please I keep touching
something oh the beauty of
lives here she comes back into the studio start the camera enter the
studio put on
mute okay there we go now we have
two all right so we're just going to bring this down
and I'm going to get the end of
my wild fire and I'm just going to attach it with a tiny little
knot it's so funny the sounds and because I'm working on a
pendant I'm going to kind of focus on you know this area down here
right and then whoa and then I'm going to
bring the needle and thread and maybe if I got in the shot that would help there we go there we go okay needle and thread
are in my left hand and they're coming under the
warps and we're going to pick
up a 4mm bead the bugle
bead and I do have to tell you that my mom literally handpicked every bugle
bead so that all four of them match for you okay so you don't have to worry that
one's going to be shorter than the other um that can be a pain in the tush all
right so we're going to thread that all the way
down and then here they come okay and then we're going to guide
these beads up and in between the wired warps so the 4 mm see how it just popped
up in there and now the bugle and I'm going to bring my pointer in so that the
beads are resting on my pointer finger my pointer this is my pointer okay it's part of my body then I'm going to take
the needle and the needle is on top of the warps going through the
bead and you just want to make sure the needle is always on top when you go back through and I could see that it's nice
and shiny want to get the rod out of the way let me get back into the picture
here and I just want to help guide so I'm guiding the
Wildfire I've got my needle in my left hand guiding the Wildfire with my
right and we got a lot of wildfire to start with so it's always a good idea
to help guide it I've got my fingers on the belly of the jewel loom so that it doesn't
wiggle and I'm going to pull all right so there is our first row
yay okay so our next row
is I'm going to pull these in
here our next row is going to be um 1 4
mm and what did I do I did green no no no yes yes yes
yes okay then I got a this gorgeous um green two hole
Square another one
and brown oh let me bring some in over here oh
there's
one okay so 1 2 3 4 five so five 6 mm beads equal one bugle bead all right and
then I'm going to pick up another four okay and we're going to let that
fall and I again just always helping to guide sorry for my big old hand there
let's get that out of the way and then we can see this hanging under the warps
right so they're under the warps we're going to carefully guide
them up the four millimeter beads going to pop up into and in
between and between the warps and I'm just letting them rest on my pointer
and we're going to take the needle we're coming back through the bead and we're
coming back through the top hole of the two hole
bead that is the goal so we just got to go slow here and we're just making
sure and we scooch up so do you see how my needle is at an
angle you you don't need to fuss with fight with worry about like it didn't really
want to go straight in so I'm like okay cool I feel you you just want me to go
in at an angle which I'm gonna do and then they figure themselves out and they
straighten up and then we're just going to pull this
through and we'll get everyone nice and straight see it all works out so you
don't have to fight with it if it feels like your needle wants to go in at an angle and then very carefully we're just
going to pull that a little bit there make sure that we don't have any loose ends on the on the end now there's a
second hole on this Square bead so we got to go back through that and what
we're going to do but we also need a filler bead right here so we need another 4 mm so I have to hand feed this one right
so I'm going to come over here I'm under the warps I'm going to pick up that
four okay and scooch it down and then I'm going to take the
needle and I'm going through the bottom hole and you're like Jules this looks
really Advanced well maybe I you know I don't think it's
super duper Advanced I think it's all about the practice right and it's so cool two whole beads are Super Rad okay
now I need another 4 mm here so I'm going to feed that last one on let's try to find
the hole without poking myself are you on there awesome and we're just going to be
patient we're going to pull the needle we're just letting everything
guide and we're helping and we're helping and we're watching and we're
taking our time and I'm going to get my big old hand out of the
way and we're going to let all of this come together and that bead's going to pop right up into the
warps oops see we got to get everybody straightened here there we
go okay now is
this or are these five two whole Square
beads um well they look like a bridge right they've got like a little ump to
them they're not laying flat they're kind of suspended in mid midair right
now but what I found and I'm just going to let me finish the motion because I don't want to forget and then totally
screw up so I'm over here on the right side which means I've got to go back
through the bottom beads the bottom holes
here and again I'm just going to guide
that okay and so you can kind of see like when I went back through and I
completed the process that they laid a little bit better but let me bring in the finished one really quick just so
you know where we're getting too once we take it off you know the um the
[Music] loom okay let's see what's happening
okay so look at look at how they lay right now like so that this piece is the finished piece you can see that once it
expands once it's off the loom that little bridge is not really you know so
poofy I don't mind it I don't think it's a dill breaker I love the Look What
could you do if you're just like I'm not feeling it I want to do something
different um you could perhaps do say
one less 6 mm square and then maybe you try
like three I'm sorry Four 3 millimeter squares you could do that you could
maybe use some um instead of five but really I I
don't mind this look but the piece is going to be yours so you kind of have to decide for yourself so there's our
second row and now the third row all
right so we're back to some more math here this is going to be um
one one four 1 14 millimeter okay so I got that up here and then these gorgeous
Fern colored little um like a little it's like a little spinner top reminds
me of that game so I've got one of those and then I'm going to pick up an 11
o and I only know to pick up an 110 because when I was laying this out it didn't work and I was like oh my gosh I
need filler beads so then I grabbed some 11s um now the next pickup is actually
going to be two okay hold on whoopsie one two 11
O's come on buddy okay two 11 O's and then another
one of these gorgeous Ferns and I got a peek where are we at
and then uh wait one two y okay one two so
then we're going to do one more of these 11 O's and then another gorgeous little
spinning top Fern bead and then so that's four okay
so let me bring let me get this last one on here and I'm going to bring it up to the camera oh my gosh look how pretty that
is so we've got a 4 mm 6 an 110
6 two 11 O's 6
1106 and a four okay so that
equals the row above it and then it also equals the one with the
bugle okay so pretty okay so let's let's get these up and on
there and we're just going to pop those in and I'm going to take the
needle and we're going through I got to be I might need a little more light on
the situation yeah hold on one quickie here I'm going to turn my light up
because trying to see those whoa those seed beads is like a little challenging
okay so let's do that again so we've got them and it's resting on my pointer my
pointer is like a best tool and I'm going through I just got to make sure I'm
getting through the 11 O's they're so stinking
small okay I
think yep come on buddy let's see does it look like I got them looks like I got
them okay and then we will oh come on
now we've got we've got a jam all right so when that happens what
I'm trying to do is oh good what I was going to say is sometimes when that
happens when your needle is being stubborn and it doesn't want to come through instead of forcing it with the
power of your hand I have found that if you bring your Flats in your flat nose
and you pull carefully for some reason it distributes better so I know Dave
David's not watching today so he's not here to tell us the uh tell us why I bet he has a good
answer for for that okay so we're just going to pull that and now we have our first three
rows now Joan has a little tip that she talked about
earlier she likes to go back through the beads to kind of
help them be a little bit more taught and not have the you know flimsy in
there um I think that's a great idea my only comment would be be careful
because you don't know how many more times you can get through that tiny hole and so you'll just have to kind of play
around to see if that happens you know if it will work especially with the 11 o on this row might be a little tough to
get back through those guys Wyatt did turn me on to the ultra fine that beon
just came out with so I am definitely going to be playing around with that um to see if it helps in these types of
situations all right so now we're going to go back to um the
for and where did we do we had a green whoops we had a green and then we
had the brown and we had whoops we had the green and we had a
brown and we had a green okay and then we need a 4mm
bead Maria you're so so funny Maria says that she has amassed
quite a collection of two whole beads Maria's um a Prof very proficient SE
beater and so we're trying to bring her to the other side here uh oh hold on
yeah don't have a bunch of stuff on your table when you're beating because your Wildfire just loves to make friends with
it all okay so so again I'm going to let that rest
on my pointer and this is just a random pattern you know like I I don't have any
Rhyme or Reason I just wanted to create something to help get you know help you
to understand how you can use different sized beads different styled beads all
right so once again making sure that I'm through the top hole and then I'm just
going to put my fingers on the jewel loom to keep it sturdy and I'm just letting that
Wildfire guide its way okay and then we're just going to
pull we're not pulling too tight but we're pulling tight enough that none of the Wildfire is loose on the ends and
then we've got to come over here and hand feed or just hey hey
hey can only imagine how many beads there are on the floor okay so then we're going
to let this string
down so I got to back it up because I need to get into the um the bottom hole here so the needle's
going into the bottom hole of the two-hole
bead and let's see are we in there yep and do a little wiggle wiggle and it looks like I made it all the way through
and then I'm going to add another 4 mm pinch those with my fingers
just so that they stay get my hand out of the
way help everybody get up into their little warped
alleys get everything aligned up all right and then we're going to go
back through and
oops so anytime that there's like a struggle of you know like you're trying
to get the needle to go straight just work with it like you can see like I'm
already back at an angle and it's fine because we can we can work it all out to and get it even um what's going on
here okay so you know you're dealing with 24 gauge
wire and the needle is trying to come through these beads and then it's trying to get over the warp and back into the
hole of this bead so just be aware of the type of material you're working with
and why there might be a little bit of a struggle and then we're just going to scooch that up and then we're going to
pull and there we we go so in no time at all we've got like four
rows and we'll do one more of the 4
mm with a bugle I love these bugle beads they're
they're coveted I have a bag that I keep a close eye
on all right and then we're going to pop those up and in between
the warps and I'm going back through the bead and again just letting the bead and
the needle and the Wildfire kind of do its thing and we're just going to do
that okay and so that would be like your you know the pattern that you were
just going to you could keep repeating but by all means you could mix it up and
do something else that speaks to you but look at how stinking gorgeous that
is isn't that so
pretty yeah widest thank you her me it takes a
village no matter what we're doing in life it takes a village whether it's raising kids
beating words yeah the green is just gorgeous I mean that's how it was like
the combination of the silver by all means I could have like found a green artistic wire but I thought well I kind
of I don't want to go with like all green and the silver is just always a really great
go-to and um and then you know it was like looking at it I was like okay this is this is
not just Big Bear this is euse so okay uh we are already I don't know
let me see let me think cuz that took a little bit more time than I thought and I kind of want to show you you know just
taking it off the loom and so we could kind of do like a little um a little
patch here so I'm I'm going to just turn I'm actually let me see can
I yeah we'll just leave it like this we'll just do something fun this will be like a little little
simple simple pended it I bet we could turn it into an earring earring if we wanted so I'm just going back through um
the bugle because it's dancing a little bit and I want to secure it a little bit better so I just went
back um and I'm under the warps and then this time I'm going to
go this is kind of like what Jones talking about you know because she she
likes her beads to be a little bit more flat um I obviously with my big hair
like things to be more dimensional and poochie Okay so we've got that going on
and what I'm going to do is I'm just going to kind of come under here let me see can I
hide I don't know I don't I don't like that okay I'm just gonna come over
here and then I'll use my Wildfire burner and I don't think you're going to see this
yeah it's so minute like you're totally never going to see that okay let me get my Wildfire
burner I don't even know how I lived before I
had I had this and this is already
whoops okay all righty and we're going to scooch that over and let me just clear
the way so yeah so this is just yeah these are fun because this just really helps you
to kind of think about how your pieces would would fit together I like this
idea a lot all right I'm GNA get my silver silk out of the way and we're going to scoot this up and
out and we're going to come to the spot
here I'm going to I want to um make sure by the way when you're cutting I like to
hold my project because we're working with glass beads right and then I'll
take my fingers and like hold on to the jewel loom and in this
case I just don't want anything to bounce so whoa like that so that's a
good thing that I had my my um hand on the
beads and what we're going to do next all right we're going to take now I
thought for Giggles I would try Danielle's you know Swift move right and I was like like oh it's not going to
work but it did so let's see if it works this time so let me get back in that wait
where you at Jules okay there we are all right and what I
found yep is that the outside look at that look how it just Glides so what's
happening is the warp is pulling pulling up but I definitely keep
my hands on everything because I don't want anything to shift
it's like so incredibly magical right I was like oh that's so cool all
right so I'm gon to come over here and do the same thing and I'm just pulling I do want to pay
attention to if there's any kinks because that's not going to
be that's not going to be a happy day so just very carefully
pulling okay and so oh my gosh looks like we just need a little more pull
over here and and so you can see and I know you all like why didn't you just use the
baby Loom I could have I could have and you can you can I just you know I was
making a bigger pendant over here and I have these coils that I want to show you how I did that so I didn't like want
to you know not show you how I did did that so okay um Let me let me do all the
things let me do all the Maneuvers here
so these two really long pieces I'm just going to keep over to the
sides these guys are obviously way too long as well I'm going to trim
them don't you know this is still workable you know keep that for whatever
CU again this is the more expensive non non-t tarnish so get rid I'll I'll trim
the two ends here the two middles and then what I'm going to do
and this is like so freaking awesome hold on don't go anywhere okay so I'm gon to bring the coiling Gizmo in all
right and let me just get that set up it's like geez jeules how how many
steps girl how many steps
okay and then I'm working with the Dow that's the number two I think that
whoops I think this is the second to the largest Dow in the kit and I'm going to reposition the
camera let's see here oh no I thought we were gonna lose
it okay let me bring it in a little
here okay is that good so I'm taking this
long end whoa where is it at this long end right here and I want this to be in front of
me and I'm just going to wrap it around the handle and then I'm going to
make a coil I feel like this should be closer hold on there we go there we go
awesome and remember when you're making your coils on your coiling Gizmo you really
do want to kind of keep them nice and taut and you got to watch so that they don't snake over each other so you see
how my pincher and my thumb are holding the wire okay and it's guiding up
onto the Dow here and I'm going to go all the
way here comes the pendant
here comes the pendant all right come on now all right
cool oh my goodness Marlon Brando is dying outside all right so we're going to slide that
off and there's that coil and then we're going to bring this in
again and we're going to go to the other side where that really super long piece
was so these are the warps and we're coiling them now it's crazy I
know oh the sound is killing me okay so we're almost up to here I'm gonna just help guide it up I don't want to screw
it up here all right perfect and then I'm going to remove this
this okay and then just like that we have these two coils right look at this and I
can bend them up just like that all right and then let's get I'm
going to remove this so that I don't stab myself because that's happened a time or
two and we'll just get these back here okay so we're
just going to take these and then I want to take my um my needle nose and we're
going to find I like to get the tip so that I get
a really tiny whoa really tiny
swirl okay and where's my flats flat nose
pliers okay there they are then I'm going to come in with my flats and I just start
to
carefully walk that swirl into
itself once it gets going come on
buddy it's moving right I can't tell if it's moving it's like so tiny okay there we
go there we go there we go come on
now come on
now see how tiny that is whoa the camera
froze there we
go some people can do it faster but I'm super weird about my
swirls I like them to just be really nice and
taut so once you get past those first few turns I feel like it rolls into
itself a lot better and then if you even wanted to you can because we'll be here till
midnight there we go so you can pitch
them so I'm kind of just finishing it by hand because of time but if it were just
me and a pair of pliers and the swirl we would just take our sweet
time okay and um you know you could do the same thing to this one or you know
you could do some fun stuff I used to do a lot of different wire working just bring in
your you know make little oh did I
freeze we've had the fighter jets over all day so who knows what's going
on and we'll just do something funky like that okay then what I wanted to do
was I was like okay well what am I gonna what am i g to you know add this to like where's the necklace part and I I looked
over and I was like oh the silver silk drawer so I grabbed some
chain and all I did did was I came over
here and I took the end of the silver silk chain let me get the nylon Jaws where
are they at just
gonna smooth that out these are your best friends when you do wire working I
don't know how people don't have them but you know you can always use the warmth from your
hands so just kiss this to the bottom
here and you could take nea's um you know the ends that he has to put the end
of the silver silk in his beautiful clasps or you can just wire
wrap you know drape it over but look at that see how it works uh
[Music] oh
oh okay are we back it looks like we're back okay so
yeah so we'll just finish this
side and you're just wrapping that wire so you're just making like a hand connection there
oops want to be careful with those ends let me trim that before I poke
myself so now you have like a little baby pendant at how cute and you could
stretch this out if you wanted to make it look more like a that game that I
don't want to say the name of look how fun oh my gosh and look at the big one so you can have like Mommy and me or
best besy pendants so fun so fun and easy okay let
me come back up Joanie wanna W to bring me on
up I don't know what's going on with these I'm
gonna okay I don't know if I just poked myself there's not blood anyway
fun so we've got the little tiny one they're really they look like little
artsy pieces super fun I probably like I'm not sure what I might turn that
a little bit had I thought about it I probably would have put it on the Dow the second
time and then made like a chunky monkey except for that it's connected to the pendant not sure how to do
that but that would be cool all right so any um questions in
regards to mixing it up and oh I did cut myself
go any questions about mixing up the beads
and how to figure that out I mean really I would just have fun with it I would
just have whatever beads it is that you're thinking of using and then I would just get the little pieces of wire
and oror needles and start building it out even if You' like sketch it out I
think that you know that would be a great idea as well um Maria said warp to your desired
WID weft I don't know what that
means but it's an idea and I love that you have ideas dab dab dab
dab nice yeah I really love warping with the wire I think that it's just
incredible um did I bring the one pendant I don't know did I show this one
pend that this was really fun so this is wire warped with
wire and then this is just using the Sor ribbon so like you can use Sor ribbon you can use the silver silk you can use
leather chain you know whatever you might have but this is pretty simple
this is all 6 mm and a um and a bugle bead so you can see those guys in
there and so yeah so again got a k for you and so those are in the shop pretty
simple easy peasy Priced Right and I'm sure you have wire and
silver silk and that might be all you need to add so
thank you guys big thank you to all of the bellicon folks that um are watching
and the where's eile let's bring eile back in and
where's her Loom at it's a nice Loom it's so
sturdy I lean in her Loom I lean on a stick I'm taking it to Texas you know I
am it's so pretty look at her name and everything and look at what Robert did
he made the little um notches so that you can tie off no matter where you are
where you start or where you end so it really makes it easier on these types of
looms for us and I love that he did that for Eileen's
folks it's got the little so this is the same grid as the small sunweaver so
it'll accommodate like you know your like point or yeah five5 millimeter hemp
cord wire of course but you always got to be careful when wire meets the wood you know just conscious of that but yes
thank you so much Deb sideways laughing yeah always interesting and fun
thank you I mean here's just another example as we're on our way out these are Boomerang beads and so you can see
like I figured out how many 5 millimeter fire polish equal a b a boomerang right how many go
across how many go in the middle how many go side to side so you really just got to get your beads and then just
start you know seeing how they how they work out and it's really fun don't make it too complicated um it it's just a fun
way to use your beads up and to make really beautiful things like I love this I
taught this one in Tucson so okay so next Thursday we will
definitely go back we will go back to preschool with the jewel loom and uh
just talk about the ins and outs and warping and if you're brand new to the jewel loom I cannot encourage you enough
to just practice don't be so hard on yourself that you think you're just
going to make some magical piece the first time around you're learning a new technique those warps are the most
important thing somebody in the group posted a picture of what she was doing
she ordered a bead kit from um another company and the beads are all irregular
they're just all irregular and so your piece is not going to look flat and
defined and delicious but that's okay because in the beginning use those beads
so you can practice and you can get your warps down they're the most important
part of looming of beating on a loom and just please don't be hard on yourself
you just need to practice so next Thursday we're going to like I said go back to preschool with the jewel loom
and um yeah going back to school going back to
school right so you got to have nice nice and Tau warps I've been doing this for a long time so don't be hard on
yourself you'll get there easy peasy pumpkin squeezy all right thank you
everyone thank you thank you thank you I spelled your name as my sister spells
hers that's okay all right so again another huge shout out to everyone there's still time to buy your bellacon
tickets um I don't know if we have that link or not but you can still I don't know if there were any Swag Bags left oh
my gosh they're like amazing so congratulation to those folks who got
one and um Nilda says absolutely need next Thursday's class I'm so a
beginner yeah and and you're going to be for a while like it's okay like I
couldn't even remotely start to do off Loom work like it would take
me a hot minute to figure that out and I'm a beater on a loom so every you know
like T tip techniques are just different and so it's
okay yeah I'm so happy you're here with us Nilda I really really am it's so cool
Jenny says she's a beginner too yeah so we'll we'll definitely we're going
we'll Post in the group if there's something specific my first thoughts are how do you set up the jewel loom how do
you insert the rod how do you warp what's that you know the distance
between the belly of the jewel loom and the warps what should the warps look like removing the rod um tension how
tight should I pull you know there there's a lot of things a lot of notes a
lot of technique and it's not always about you
know right fabulosity because you got to get you got to get up to that point right you
got to get up there so we'll get there there's a whole bazillion amounts of
people who are who are weaving on the Jill Loom so we're all good all right I
will see you Joan will see you we appreciate you so very very much please let me know if you have any questions
Post in the Jew Loom group if you have specifics that I've not mentioned and I will see you one quick note I'm going to
be on Monday April 8th Eclipse I'm going to be on with the total eclipse creative
Soul kit for April those are going fast and the new Mini Moon Loom which of
course is on the other side of the room I will be demoing I think I'm going to start like
at 10:00 in the morning and I'm just going to keep going I'm going to make rings I'm gonna make a lot of rings I
want to make rings so Monday I'll send out an email if you're not on the
newsletter list please sign up for the email and you will know what time I'm going to start for sure but it's with
the creative Soul total eclipse kit and the new Mini Moon Goddess Loom she is
gorgeous she's just gorgeous maybe Eileen will join
me ien on a stick she's gonna die all right I love you guys we'll see you
later